

Vanilla Marshmallows
A few years ago, I started making my own marshmallows and I have never looked back! Homemade marshmallows are insanely more awesome than the ones you buy in the store and are easier than you’d think. Once you’ve made your own marshmallows, you’ll never be able to eat the store-bought ones (sorry/not sorry to ruin that for ya- ha ha)! Not to mention the fact that you’ll impress your friends. I’ve made these marshmallows and served them to friends or given them away and people are always totally impressed. I almost feel guilty accepting all that praise, when they aren’t that difficult….almost.
One of the tricky things that can deter people from making marshmallows is that you do need a few additional tools in your kitchen: a candy thermometer and a mixer. The thermometer is important because the sugar syrup needs to be at the exact right temperature to ensure the marshmallows are fluffy. It’s not something that can be “eyeballed”. Some grocery stores have candy thermometers, but you can also find them on Amazon, Target, Fred Meyer or your local kitchen shop. You should be able to find one for under $15. The main thing to look for is one that has a clip, so that you can attach it to your pan. A stand or hand mixer is necessary because you are going to be beating the mixture for at least 10 minutes- this is not a “whisk by hand” situation.
Ok, now that we’ve got that technical stuff out of the way, let’s make marshmallows!
Put the whisk attachment on your mixer. We want as much prepped as possible, so that when the syrup reaches the right temp, we can go! Open the packets of gelatin and pour into the bowl. I actually make marshmallows enough that I bought a large can of the gelatin on Amazon and just measure out 22 grams into the bowl. If you want to just buy the packets, they typically come in a small box of 4. At my grocery store, the unflavored gelatin is next to the jello and pudding cups, which is in the baking aisle. Take half of the cold water and gently pour it over the gelatin in the bowl.

Now we are going to make the sugar syrup. Put the rest of the cold water, corn syrup, sugar and salt into a small saucepan. If you can, use one that has straight sides.
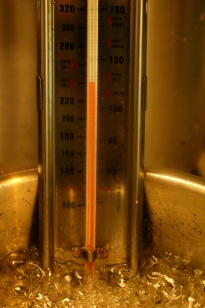
It’s done!
The straight sides will be easier to clip your candy thermometer to, later on. Mix gently and put the heat on medium-high. Cover with a lid and heat for 4 minutes. Take the lid off and now you’re going to clip your candy thermometer to the side. At this point, make sure you are paying attention. You don’t have to stare at the thermometer, but now is not the time to throw in a load of laundry or go check the mail. Make sure you don’t venture far from the stove. You want to make sure it doesn’t bubble over. You are also waiting for the mixture to each 240°F. It typically takes about 8 minutes on my stove top, but results may vary.
Once your sugar syrup reaches 240° F, take it off the heat. Start your mixer on low, then slowly pour in the sugar mixture in a steady stream. Be really careful because the syrup will be really hot (240°, to be exact!). Once all of the syrup is added to the gelatin, turn your mixer up to high. Beat for about 10 minutes, or until the mixture has cooled slightly and fluffs up.
While that is being whipped, prepare your pan. Lightly grease a 9×13 inch pan with vegetable shortening. Mix the cornstarch and powdered sugar together and put a few tablespoons in the pan (keep the rest for later). Tap and rotate the pan to remove any clumps of powdered sugar and cornstarch and spread over the bottom and sides of the pan.

Turn your mixer down to medium and add the vanilla bean paste. If you can’t find vanilla bean paste, you can use vanilla extract (1 teaspoon). I just feel like the flavor of vanilla bean paste is more intense than extract. I found the paste on Amazon, but you may be able to find it at your local grocery store or a specialty kitchen shop like Williams Sonoma.
Whip the mixture for another minute to fully incorporate the vanilla. With a rubber spatula, spread the fluff into your prepared pan. Top with a little of the powdered sugar mixture. Let this sit at least 2 hours and up to overnight, uncovered.


Now it’s time to cut the mixture into marshmallows! I usually just cut them into big marshmallows (about 1.5″ squares), but you can make minis, or even shaped ones with cookie cutters.
Dust a large cutting board with more of the powdered sugar/cornstarch mixture. Reserve about half because you’ll need more as you start cutting the marshmallows. Take the mixture out of the pan. It may stick a little bit, so you’ll probably have to get your fingers under the mixture to release it from the pan. Use a sharp knife, pizza roller, or bench scraper to cut your marshmallows into the desired size. I like to cut it all into strips first, coat the strips with powdered sugar/cornstarch, and then cut into squares.

They’re almost marshmallows!
Put some powdered sugar/cornstarch into the bottom of the container you’re going to store the marshmallows in (I usually just use a large ziploc freezer bag). Put the marshmallows in the container and add more of the powder so they don’t all stick together.
And there you have it- MARSHMALLOWS!

These marshmallows are so gooey when they melt and have a tremendous flavor. Now that you’ve made your own marshmallows, there are all kinds of things you make with them:
- Make s’mores


- Make delicious and gooey Rice Krispy treats
- Top hot chocolate or my favorite, coffee (I know it sounds strange, but it is delicious!)

- Rocky Road
You can also make different flavors of marshmallows, substituting the vanilla for other things. Here are some of the other flavors I’ve made:
- Mint
- Lemon
- Strawberry
- Cocoa
- Scotch
Enjoy! I’d love to see how you use the marshmallows- you can follow me on Instagram and share your pictures @bythepounds
 Save Recipe
Ingredients
- 1 2/3 cups sugar
- 3 packets or 22 grams unflavored gelatin
- 1 cup cold water, divided
- 1/4 teaspoon salt
- 1 cup corn syrup
- 1 teaspoon vanilla bean paste
- 1/2 cup powdered sugar
- 1/2 cup cornstarch
- vegetable shortening to grease the pan
Instructions
- Put the whisk attachment on your mixer. Gently pour 1/2 cup cold water over the gelatin in the bowl of your mixer.
- Put the remaining cold water, the corn syrup, sugar and salt into a small saucepan.
- Mix gently and put the heat on medium-high. Cover with a lid and heat for 4 minutes.
- Take the lid off and clip a candy thermometer to the side.
- Once the sugar syrup reaches 240° (about 8 minutes), take it off the heat.
- Start the mixer on low, then slowly pour in the sugar mixture in a steady stream.
- Once all of the syrup is added to the gelatin, turn the mixer up to high.
- Beat for about 10 minutes, or until the mixture has cooled slightly and fluffs up.
- While the mixture is being whipped, prepare the pan by lightly greasing a 9x13 inch pan with vegetable shortening. Mix the cornstarch and powdered sugar together and put a few tablespoons in the pan (keep the rest for later). Tap and rotate the pan to remove any clumps of powdered sugar and cornstarch and spread over the bottom and sides of the pan.
- Turn your mixer down to medium and add the vanilla bean paste.
- Whip the mixture for another minute to fully incorporate the vanilla.
- With a rubber spatula, spread the fluff into your prepared pan. Top with a little of the powdered sugar mixture.
- Let this sit at least 2 hours and up to overnight, uncovered.
- Dust a large cutting board with more of the powdered sugar/cornstarch mixture. Reserve about half of the mixture because you'll need more as you start cutting the marshmallows.
- Take the mixture out of the pan. It may stick a little bit, so you'll probably have to get your fingers under the mixture to release it from the pan.
- Use a sharp knife, pizza roller, or bench scraper to cut your marshmallows into the desired size.
- Put some powdered sugar/cornstarch into the bottom of the container you're going to store the marshmallows in. Put the marshmallows in the container and add more of the powder so they don't all stick together.